If there’s one thing I love as much as cooking in the classroom, it would have to be simple science experiments! There is something so fulfilling about watching the pure sense of wonder emerge across your students’ faces when introducing them to science experiments. While I LOVE classroom science; I’ve noticed it’s all too common for teachers and SLPs to hesitate to bring science into their lessons because of the worry that it’s going to be messy, complicated, or hard to pull together. I’m here today to debunk those myths with my all-time favorite simple science experiments that will elevate your speech lessons and excite your students!

WHY BRING SCIENCE TO THE CLASSROOM OR SPEECH ROOM?
You probably already know how much I love using hands-on learning in my speech and language therapy activities. Whether it’s sensory bins, play-based therapy, or cooking I’m here for it!
Hands-on lessons are a great way to tie in thematic activities and they can do absolute wonders for your speech therapy sessions. Simple science experiments are no different!
Planning for some dedicated science time in your speech lessons can help capture the attention of your little learners and focus on key skills in a new and engaging way.
Just as with many of my cooking activities, science can help your students with vocabulary, grammar, following directions, expressive language, asking/answering questions and so much more.
Bringing science experiments into the classroom will provide endless opportunities for your students to practice key skills and meet learning goals in a hands-on format.
SIMPLIFY YOUR PLANNING
Have I convinced you to give some simple science experiments a try with your littles? Lucky for you I have the perfect resource to simplify your planning and help meet your speech-based goals!
My Simple Science Visual Experiments pack is filled with 15 different activities that you can easily incorporate into your therapy sessions, classroom, or even at home with your kids. These simple science experiments are quick to prep, require only basic tools and ingredients and best of all, are SUPER kid-friendly!
In this comprehensive resource, you will find everything you need to facilitate hands-on learning in your classroom. The pack includes step-by-step directions for each experiment, with a full-color visual card detailing each step. The visuals are essential for the SLP classroom!
The visual cards are a great aid in practicing vocabulary, sequencing, and modeling how to follow directions with your students. And for your non-verbal students or those with limited verbal skills, they provide opportunities for interacting with the vocabulary and language in a hands-on and visual way.
This resource also includes a list of IEP goals, vocabulary cards, sentence strips, comprehension questions, and data sheets to record progress.
Your students will love the engaging science experiments in this set and you will love the ease of conducting them!
Activities you will find in this fun resource include “Dancing Rice”, “Fluffy Slime” and a “Lemon Volcano”. These silly topics are sure to draw in any young student or client!
Bringing these activities into your regular SLP routine will engage young learners and motivate them to continue working towards their speech goals in a way that feels new, exciting, and FUN!
TIE IN LEARNING GOALS
As you complete the experiments with your students you will see I have built-in many opportunities to tie in learning goals. During planning, take a peek at the IEP Goal sheet I have prepared to choose your areas of focus. Also, be sure to take your time as you complete the simple experiments to get the most out of your lessons!
1. SET THE STAGE FOR SUCCESS
Before you begin, take some time to go through the vocabulary cards included with this resource. These full-color visuals are a great way to practice articulation, using words in a sentence, and asking/answering questions.
I like to layout the vocabulary cards for all the materials we will be using and have my students take turns choosing a card off the table, saying the name of the item, and then finding it on the table.
You can also ask your students to categorize the cards by “tools” or “ingredients”.
Another great exercise is to use this time to describe the ingredients using 2-3 words. For example, lemons are yellow, bumpy, and sour!
These are all great starter activities and will get your clients and students VERY curious and excited about what is about to come! Take your time and make a game out of this piece of the lesson to really get those brains working!
2. COMPLETE THE EXPERIMENT
Once you’re ready for the experiment, work your way slowly through the visual direction card. These experiments are simple and can be completed quickly, but I like to take my time with this step to make sure we are touching on each of those IEP goals.
Use this time to focus on asking/answering questions, sequencing events, and following directions.
This is also a good time for students to use the sentence strips included as well.
Students can use the sentence strips to request an item for the next step, respond to a question being asked, and for identifying what will happen next.
3. FOLLOW UP
Once the experiment is complete, you can work on the included comprehension questions with your students. This is one of my favorite ways to follow up, as the children are typically so excited about the experiment they are eager to answer the questions!
There is a separate comprehension card with visual answers for every experiment. This is the perfect tool for providing just the right amount of support for each child.
There is also a data reporting sheet and parent communication log to track progress and keep families in the loop on your lessons.
Extend the lesson even further, by sending home the included black and white homework page for families to complete together!
GIVE SCIENCE A TRY IN YOUR CLASSROOM
If you’re ready to give simple science experiments a try in your own classroom, I have just the freebie for you!
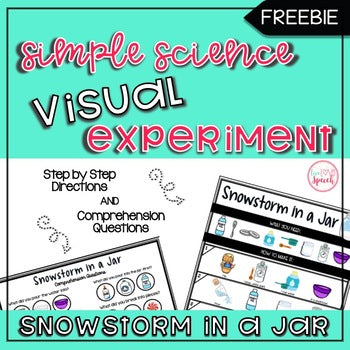
This Snowstorm in a Jar Freebie is the perfect way to test out Simple Science Visual Experiments in your classroom. This fun activity comes with everything you need to facilitate a simple and engaging science project in your SLP sessions.
Your students will use the step-by-step, visual direction card to create their very own winter wonderland in a jar. This activity is such a fun way to work towards your speech-based learning goals in a hands-on and exciting way. With this freebie activity, you can target skills like WH questions, vocabulary, following directions, sequencing, expressive language and SO much more!!
Grab the freebie and get started right away with simple science experiments you and your students will love. You will be amazed just how much speech-focused learning can happen during science time!
MORE SIMPLE SCIENCE FUN!
If you LOVE this freebie, I know my Simple Science Visual Experiments is just the resource for you! Grab the whole set of 15 simple science activities and dive into hands-on learning with your students all year long!

SAVE THESE IDEAS FOR LATER!
Don’t forget to pin this post to your favorite Pinterest board so that you can easily find it when you’re ready to explore simple science with your kiddos! Have fun exploring with your little learners! Until next time, friends!


